Milk kefir is not only easy to make, it is a delicious, probiotic-rich, versatile beverage your whole family can enjoy. Whether you are just exploring how to make milk kefir at home or have cultured dairy before, this video and instructions for our milk kefir recipe are here to help make culturing kefir at home easy.
10 minutes
12 hours
5
INGREDIENTS AND EQUIPMENT AVAILABLE AT CULTURES FOR HEALTH
Milk Kefir Starter Kit

Milk Kefir Starter Kit
$46.99
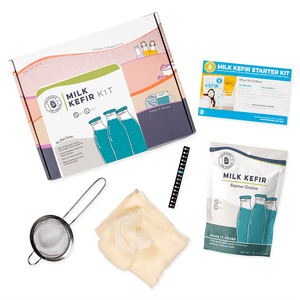
Designed for beginners, this kefir starting kit contains our Milk Kefir Grains plus 3 tried-and-true culturing supplies to make it easy to get started making milk kefir at home. Just add milk!
Packaging and Equipment in the kit may appear different than pictured.
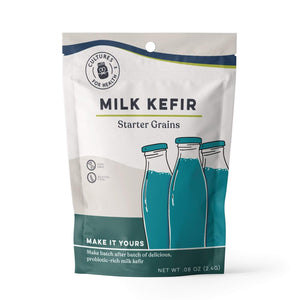
Milk Kefir Grains

Milk Kefir Grains
$26.99
Milk Kefir grains are live probiotics in the form of soft, jelly-like ‘grains’. They are grown in milk, thus giving it their name. The term "kefir grains" describes the look of the culture only, but they aren’t actually grains.
When healthy and fed, these grains will continue to grow and multiply.
Milk Kefir has many health benefits and is one of the richest sources of probiotics!
Just one pouch of grains will culture 4 cups every day. Drink it up, or enjoy your Kefir in smoothies, ice cream, baked goods, and other recipes.
*Milk Kefir is Excluded From Discounts
BEFORE YOU BEGIN MAKING MILK KEFIR
- These instructions utilize the traditional starter culture known as milk kefir grains, rehydrated and ready to make milk kefir. If you wish to make milk kefir with a powdered Kefir Starter Culture, consult our article on How to Make Kefir with Direct-set Starter Culture.
- If you have purchased our dehydrated milk kefir grains, please follow the instructions included with your milk kefir grains or watch our how-to video on How to Activate Milk Kefir Grains to get started.
- If you wish to use raw milk to make milk kefir, be sure to activate your milk kefir grains using pasteurized milk first. You can then slowly transition them to raw milk.
HOW TO MAKE MILK KEFIR
To get started, first, gather your supplies and choose a variety of milk to use.

Supplies for Making Milk Kefir
You'll need the following supplies to make milk kefir, most of which can be found in the Milk Kefir Starter Kit. For more information on what supplies work best (and what to avoid) read our tutorial: Choosing the Best Equipment for Making Milk Kefir.
-
- Glass jar
- Non-metal stirring utensil
- Breathable cover for the jar such as a tight-weave towel, butter muslin, paper towel, or paper coffee filter
- Band to secure the cover to the jar like a rubber band or canning jarring
-
Fine mesh strainer for removing the kefir grains from the finished kefir
Ingredients for Making Milk Kefir
Consult our article on choosing milk for making kefir to help you decide which milk is best for you!
-
- 1-2 teaspoons active Milk Kefir Grains
- Cow or goat milk
MILK KEFIR RECIPE
- Transfer the active milk kefir grains into up to 4 cups of fresh milk.
- Cover with a coffee filter or butter muslin secured by a rubber band or jarring.
- Place milk kefir culture in a warm spot, 68°-85°F, to culture.
- Culture until milk is slightly thickened and the aroma is pleasant. This generally takes 12-24 hours but can take less time in warmer temperatures, so keep an eye on your grains.
- After the milk changes the texture and culturing is complete, separate the kefir grains from the finished milk kefir.
- Place the milk kefir grains in a new batch of milk.
-
Store the finished kefir in the refrigerator.
Milk kefir is a healthy, delicious, and nutritious probiotic drink that is easy to make. Download our Milk Kefir Guide and Recipe book which provides all the information you need to get started, including detailed instructions, recipes, and tips.
REMOVING GRAINS FROM FINISHED MILK KEFIR

Removing the grains can sometimes cause new fermenters some trouble. As the milk kefir ferments, curds will sometimes form in the kefir. This doesn't cause any problems, but it can be confusing when you're new to differentiate between curds and milk kefir grains.
Use Your (Clean!) Fingers
As your milk kefir grains grow in size, you may choose to remove the kefir grains by hand. Make sure your hands are very clean and well rinsed, but do not use anti-bacterial soap to avoid contaminating the culture.
Use a Mesh Strainer
Sometimes milk kefir can be a bit thick. If necessary, you can use a silicone spatula or plastic spoon (in a swirling motion) to help work the kefir through the strainer. Stainless steel can be used if necessary; just be sure it's stainless steel and not a reactive metal.
Pour Milk Kefir Into A Shallow Bowl
This will make the grains easier to see. Using a plastic or wooden spoon, scoop the grains out. Once the grains have been removed, pour the finished kefir into a container.
Download our Milk Kefir book today and start making milk kefir as a great way to improve your digestive health. Get more probiotics into your diet and enjoy delicious and nutritious milk kefir drinks.
OVER-THICKENED MILK KEFIR
While milk kefir is culturing, it may culture faster than you expect. If it's over-cultured, it may be full of curds and you may need to strain your kefir grains with extra care. You can find tips in our Straining Over-Thickened Kefir tutorial. This extra thick kefir is also a great opportunity to make some fantastic kefir cheese!
Want to make milk kefir but don't know where to start? Download our free Milk Kefir Guide and Recipe Book today!
Following the above process, you can make milk kefir at home on a regular basis. If after making milk kefir for a while you decide you don't need 4 cups every day, it is possible to make smaller batches. Just choose a method in our tutorial How to Slow Down Making Milk Kefir + Make Smaller Batches.
Resting Your Milk Kefir Grains
If you ever reach a point where you need to take a break from making milk kefir, there are a few ways you can put your kefir grains on pause. This includes refrigerating them for shorter breaks or drying them for longer breaks.
In either case, it's important that your grains have been activated and culturing kefir regularly for 3 to 4 weeks before you attempt either of these resting methods.
SEE INSTRUCTIONS: How to Take a Break From Making Milk Kefir
START MAKING KEFIR MILK WITH CULTURES FOR HEALTH
The best place to find all of your milk kefir needs is Cultures for Health. We have the largest selection of fermentation and cultures products in the world and the best customer service for any of your questions.
The best place to start is our amazing Kefir Starter Kit. This kit comes pre-packed with everything you need including:
- 1 - Box of Milk Kefir Grains (re-usable heirloom grains)
- 1 - 2.5-inch Nylon Mesh Strainer
- 1 - Stick-On Thermometer
- 1 - Butter Muslin Jar Cover (1 square yard)
You'll also receive detailed instructions to complement the ones you just read to make the process as easy as possible.

Click here to check out the Milk Kefir Starter Kit now!


